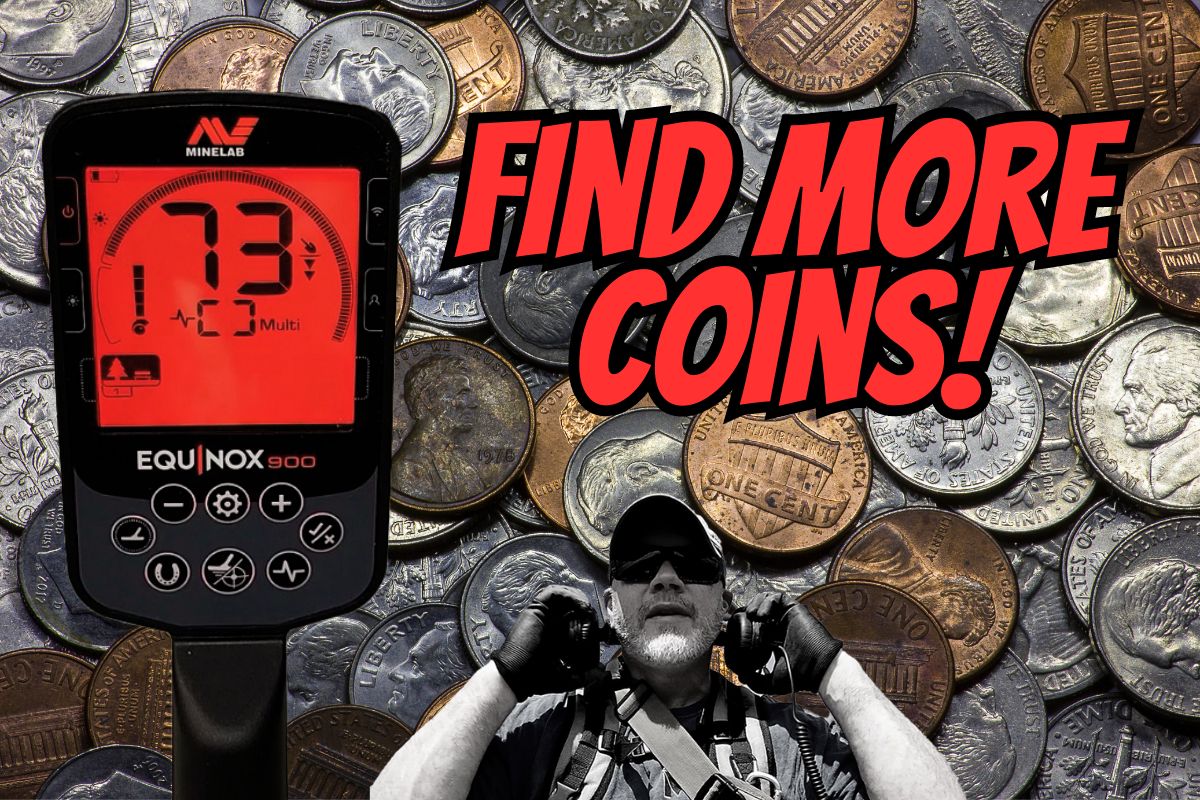
If you are looking for a how-to written guide to setting up a coin program for the Equinox 900, look no further. In this article, I’ll walk you through my Ultimate Coin Setup that will cover just about every coin you will ever find in the United States.
What You Need to Know First.
Before we get in the details I need to mention a few things:
- If you are not familiar with navigating around the Minelab Equinox 900, you can review the manual by going here.
- In this article, I’m only showing you how to setup my coin program for the Equinox 900. You do not have the same features on the Equinox 700 that will allow you to setup this coin program. If you want see the differences between the Nox 700 and 900, check out my article.
- This coin setup will not remove your ability to find gold rings, coins etc. Those items can still be heard but I have lowered the pitch and/or the tone volume to make those signals sound different. You will also find a lot of junk in those ranges and the chances of find a gold ring/coin over junk is a lot lower. However, I didn’t want to eliminate your ability to find those gold items so I lowered the pitch tone or the tone volume.
- This is not a good coin program for European coins or coins in other countries. I don’t have those coins to test with so this coin program is strictly for the Equinox 900 owners in the United States.
- Finally, this coin setup is based on sound and numbers. I recommend listening to the tones and try not to look at the numbers. If you swing over a coin, you will definitely know it. A lot of the foil and junk targets will sound different and broken up. To be certain, try turning 90 degrees on the target and swing over it again. If the tone goes away or the numbers shift greater than 10, it is probably an undesirable target.
Keeping those 3 things in mind as you begin to use this program, will help you tremendously.
Basic Settings First.
Here are the basic settings you will need to setup in addition to the advanced settings that I will cover later in the article.
- This Equinox 900 Coin Setup is based off of the Park 1 Search Program.
- This coin setup is based on using a 5 Tone setup. Anything other than 5 will not work for this coin setup.
- Recovery Speed is set at 4 but you can adjust it to your conditions. The lower the recovery speed the more potential depth you can gain. The higher recovery speed settings will significantly lower your ability to detect deep targets but you gain the ability to hunting in trashy, iron infested sites where coins won’t be very deep anyway.
- Iron Bias (FE) is set at 2 but you can go up to 4 but I recommend not going beyond 4 as you will comprise depth beyond 4.
- Iron Bias (F2) is no longer available in Nox 900. If you are looking for it, its not there. Minelab combined F2 and FE together for the Equinox 900.
- Sensitivity Setting – you can set this as high has your permission allows. I run mine as high as I can.
What is Notched/Accepted/Rejected.
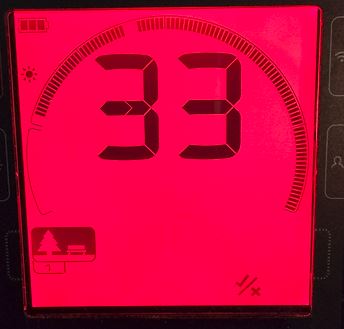
Notching is also referred to as Accept/Reject on the Minelab Equinox 900. There are only 3 target IDs that I notch out. They are 31, 32, and 33. These numbers will remove some of the foil and junk targets without compromising coins. However, there may be some gold targets or buttons that “could” fall within these numbers.
This is what your Accept/Reject should look like after removing 31, 32, and 33.
Advanced Settings.
Setting Up The Tone Breaks.
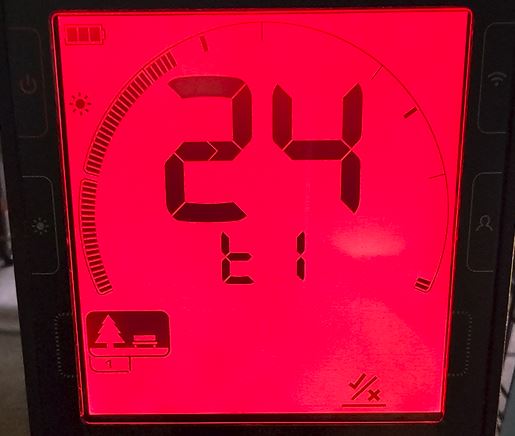
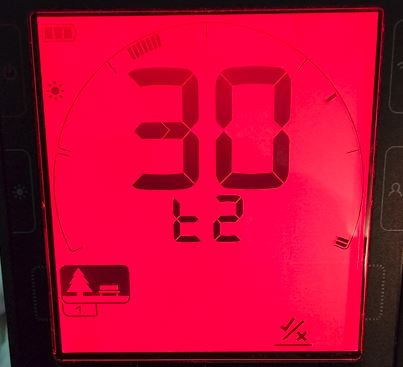
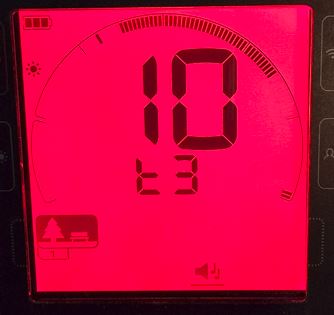
You must set up the Tone Breaks first before setting up the Tone Volume and/or Tone Pitch. To setup the tone breaks, press the settings “gear” icon and move all the way over the Accept/Reject (Next to last icon on the right in the settings menu). Hold the gear button down until you see the advanced menu to assign tone breaks. You can move between tone breaks by hitting the Accept/Reject Button. To change the value, use your + and – buttons.

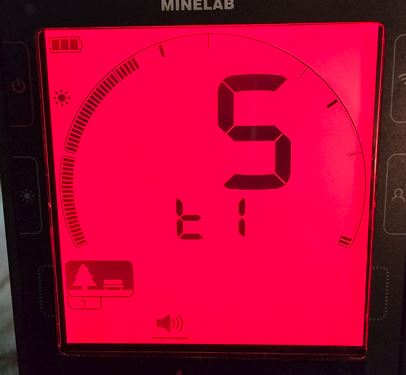
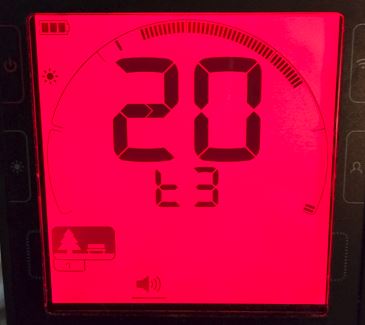
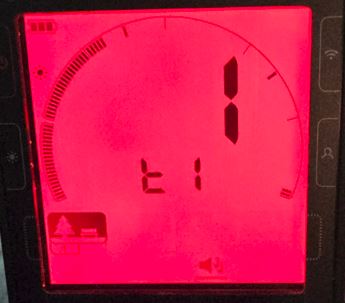
- Tone Break 1 = 0-24
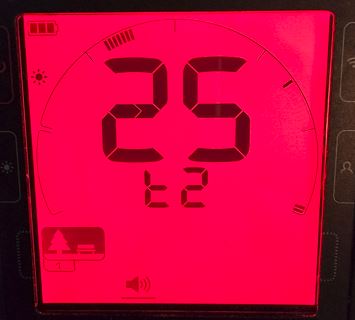
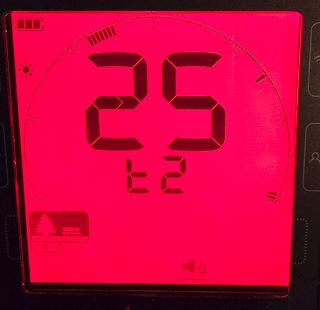
- Tone Break 2 = 25-30 (Nickels) – Note: You may have to adjust this tone break first before you be able to adjust the first tone break to 24.
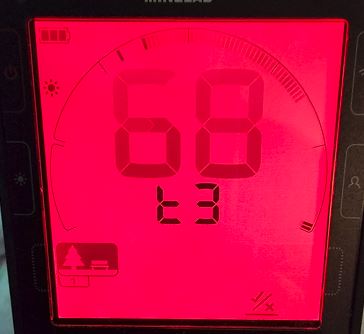
- Tone Break 3 = 31-68 (Pay attention to numbers 55-57, some Indian Head Pennies will fall in this range.
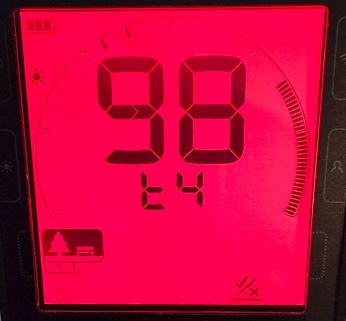
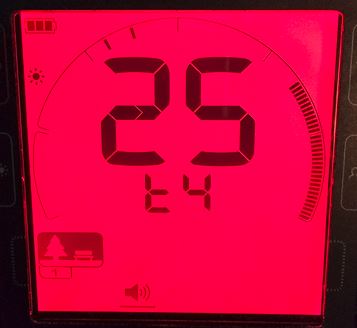
- Tone Break 4 = 69-98
- Tone Break 5 = You won’t have the ability to change this tone break. In fact, it will only show you 4 tone breaks, you will not see the 5th tone break.
When finished, press and hold the gear button again to take you back to Accept/Reject where you can navigate through the settings options again.
This is what your Tone Breaks should look like when you have them set up correctly.
Setting up Tone Volumes (Note: Tone Breaks Must Be Setup First)
While in the settings menu (quick press the gear icon) move over to the Volume Adjust icon, long press the gear icon again until you see the advanced menu. Like you did before, navigating through the tone breaks is done by pressing accept/reject. To change the value use the + and – buttons.

- Tone Break Volume 1 (0-24) = 5
- Tone Break Volume 2 (25-30) = 25
- Tone Break Volume 3 (31-68) = 20
- Tone Break Volume 4 (69-98) = 25
- Tone Break Volume 5 (99) = 25
When finished, press and hold the gear button again to take you back to Volume Adjust setting where you can navigate through the settings options again.
This is what your Tone Volumes should look like when you have them set up correctly.
Setting up Tone Pitch
While in the settings menu (quick press the gear icon) move over to the Target Tone icon, long press the gear icon again until you see the advanced menu. Like you did before, navigating through the tone breaks is done by pressing accept/reject. To change the value use the + and – buttons.

- Tone Break Pitch 1 (0-24) = 1
- Tone Break Pitch 2 (25-30) = 25
- Tone Break Pitch 3 (31-68) = 10
- Tone Break Pitch 4 (69-98) = 25
- Tone Break Pitch 5 (99) = 25
When finished, press and hold the gear button again to take you back to Target Tone setting where you can navigate through the settings options again.
This is what your Tone Pitch set up should look like when you have them set up correctly.

You Are Now Setup For Great Coin Experience!
To make sure its working, test out some coins in your back yard or garage. If something sounds off, double check your tone breaks and make sure your numbers match what I listed here.
Still a Little Confused? Try Watching This.
Some folks enjoy videos and if you are that type of person who needs to see things being done, I totally understand. That is how I learn too. Luckily, I also made a video about setting up this coin program. If you are still a little confused or maybe you want to double check your setup watch this video below.
Are You Looking to Purchase The Equinox 900 Metal Detector?
If you read this article and realized that the Equinox 900 might be for you but you aren’t sure where you can purchase one, I recommend Fort Bedford Metal Detectors. I have been recommending them for several years. They are a great company with a great reputation and great service. Tell them Mental Metal Detecting sent you.
Mental Metal Detecting is a participant in the Amazon Services LLC Associates Program, an affiliate advertising program designed to provide a means for sites to earn advertising fees by advertising and linking to Amazon.com. Mental Metal Detecting also participates in affiliate programs with Bluehost, ShareASale, and other sites. Mental Metal Detecting is compensated for referring traffic and business to these companies
Find Out More About The Equinox 900
Minelab has been making a lot front page news lately with their latest revitalization effort to upgrade one of their best selling metal detector, their Equinox. The Equinox has been one of Minelab's...
What's The Difference Between The Minelab Equinox 800 and 900?
Minelab made a bombshell announcement that took everyone by surprise. Not only is Minelab releasing a new Manticore Metal Detector, they also announced that there will be 2 additional metal detectors...